Increasingly, the line between using Facebook for personal purposes and business is getting blurred. Perhaps you initially started your Facebook account to socialize with friends and family but now you receive and solicit friend requests from business associates, vendors, other attorneys, etc. It's important that you understand how to setup friend lists to segment the various groups of "friends" in your account. Additionally, you should understand how to customize the privacy settings for each friend list so you don't grant access to your kids birthday party photos to your business colleagues.
Many people don't realize this functionality exists in Facebook. Others have found it difficult to setup. Below is a tutorial detailing the steps to take.
Friend lists are a way to segment your list of friends on Facebook. Once you setup a friend list, you will be able to customize the privacy settings for each individual friend list you create. The benefit is that you can block wall posts or photos for example from your business contacts but still share these components with your friends and family.
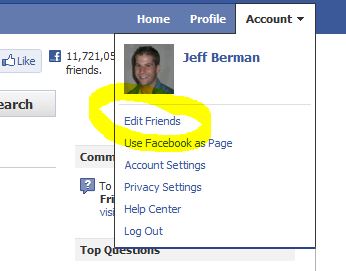
First you will go to your Friends Page by clicking the "Account" drop-down on the top right of your screen and selecting "Edit Friends".
Next, click the "Create New List" button at the top of the page to create a new list. Type the name of your new list and then select the friends you'd like to include in the list. When you have finished, click "Create List".
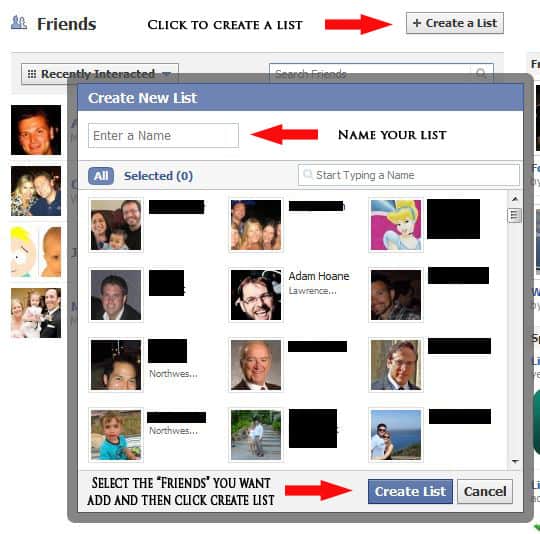
You now have created a segmented list of your friends in Facebook.
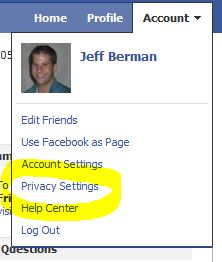
Friend lists enable us to create different privacy settings for different groups of our friends. Now that you have created a friend list, we want to adjust the privacy settings for our list. To do this, you will click the "account" button and select Privacy Settings.
On the privacy settings screen that follows, you will select "Customize Settings" at the bottom of your privacy selections:
From this screen you will be able to customize the access to the various components of your Facebook account for each friend list. In order to do so, you will select the drop-down for a particular setting you want to edit, and click customize.
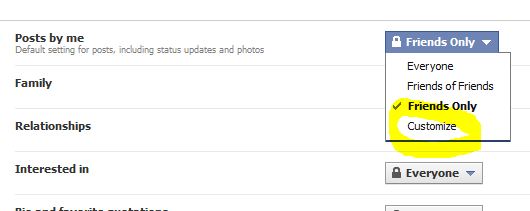
A selection box will appear where you can choose the individuals or friend lists you want to hide the information from. In order to block a friend list from the information you are editing, you simply need to type the name of your friend list in the box and then click save setting.
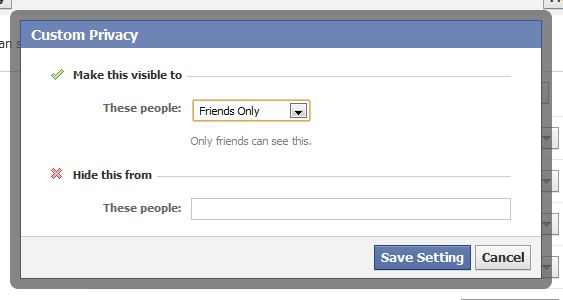
You can repeat the process for each of your settings and profile components. Understanding how to create these segmented lists and controlling your privacy settings allows you to take control of your Facebook profile information and the access your "friends" have to it. In my experience, this has allowed me to connect to business associates more openly and expand my networking circle.
For more detailed information on using friend lists and privacy control with friend lists, visit this help section Q & A on Facebook.

Over the years, law firm prospects have sent us reports from just about all of our competitors. Unfortunately, even today, some law firm marketing agencies still mislead their clients via "reporting." One particularly egregious example comes in the form of ranking reports. Which prompted this LinkedIn post. To my surprise, I received a lot of […]
John Wanamaker supposedly said "Half the money I spend on advertising is wasted; the trouble is I don't know which half." In an an effort to figure out "what half is working," attribution was born. Coupled with a transition from traditional, offline ads to digital media, attribution became the holy grail for analyzing advertising spends. But […]
I recently asked ChatGPT, "What are some of the top personal injury law firms in Chicago?? Actually, first I ask "who are some of the top personal injury lawyers in Chicago?" ChatGPT couldn't handle that one, so I modified the prompt. ChatGPT listed five very well-known firms downtown. Can you guess the other four? That's […]
If you're like me, you have some degree of AI, ChatGBT, Bard, exhaustion. Now don't get me wrong, this is stuff is remarkable and is changing, well, a lot. But before you hook up the ChatGPT API to your WordPress API and crank out 10,000 pages, here are a few things to think about. Let's […]
If you know me, you know my opinions about links and SEO advice from Google. If you don't, here's the TL;DR: Meh, links! Meaning, all things being equal, links still remain a competitive difference maker for ranking. Take Google's SEO advice with several grains of salt. Google has no economic incentive to help your site […]
The best marketing advice I can give you is to be authentic. Of course, you don't find that very helpful in terms of meeting your growth goals. So, you might decide to game the system. As I'm writing this, one of the more popular ways to gain the system is to pay for engagement. This […]
The following post was written by ChatGPT. ChatGPT, developed by OpenAI, is a state-of-the-art language model that can generate human-like text based on a given prompt or context. This technology has the potential to revolutionize the way that businesses, including law firms, market themselves to potential clients. One way that a law firm could use […]
How long does SEO take? When can I expect to see results? What results should I expect to see? These are all reasonable questions that we field from lawyers every day. And, like many legal answers, the answer is: It depends. Yes, I know that's not the answer you wanted. But it's the most honest […]
And how much time should they spend doing it? I recently had the privilege of chatting with Tyson, Jim, and Conrad for an upcoming episode of The Maximum Lawyer Podcast. If you're not familiar with The Maximum Lawyer community, you should definitely check it out. Jim asked a really great question about who should do […]